Thursday, 31 March 2011

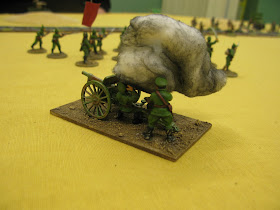
Red Armoured Train [8]


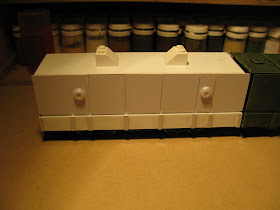
I've been playing around with various options for the command / machine gun wagon over the last couple of days. I've plated up one side and added machine gun ball mountings from a plastic bead cut in half with a razor saw. It's a bit crude but I'll see if I can add some details to make it look more effective.

The other thing I've tried out are the different options for the roof mounted cupolas, all of which have been scrounged from the lego toy box. I'm not sure which arrangement looks the best so will try out a few more combinations before I decide what to do.

I'll also add a door and vision slits to the sides of the wagon so that the machine gunners have something to look through when they fire their broadsides at whatever happens to trundle into range. I'm hoping to finish off this wagon by the end of the weekend, so that I can tackle the engine and tender.

DH10A Bomber

I' ve been trying to find one of these old Aurora / K&B kits at a reasonable price for a long time but they always seem to go for a small fortune on ebay. However, the other day I put in a bid on a boxed, unbuilt kit and won it for twelve quid, postage included.

http://wwiaviation.blogspot.co.uk/
What I'll do with it is another question?


I plan to use it as heavy air support for my long planned British Expeditoinary Column to the Back of Beyond. In the army list for the British Indian force you are allowed to have up to two aircraft so, rather than use the ubiquitous SE5a or Camel, I thought I'd intimidate the natives and/or Bolsheviks with a suitably enormous flying machine.

They were actually used over the North West Frontier in the Third Afghan War and subsequent colonial police actions of the early 1920's, so I reckon I can use one without any questions being asked by the purists. It is, however, absolutely massive, so I'll have to work out how to make a stand for it and how I can transport it without the sound of crunching or snapping plastic!

Tuesday, 29 March 2011

Red Armoured Train [7]

You're probably fed up with this already but I have finished off the artillery wagon this evening, with a bit of light weathering and a few subliminal rust streaks. I also painted the buffers and couplings with three drybrush coats of Foundry Charcoal Black, followed by an overbrush of GW Mithril Silver. To round thiings off, I spayed the whole thing in Army Painter matt varnish to seal in the decals and tone down the shiny effect of the wash.

Now it's done I'll crack on with the command wagon, which I'm hoping to finish by this time next week. I have some ideas for the machine gun mountings but these are a bit sketchy at the moment, so we'll see what happens when I get around to the actual scatchbuilding. I'm off to France for the Easter holidays, so the engine and tender will have to wait until I get back.

633 Squadron Update

I got the 1:600th scale Tumbling Dice Mosquito MkIV's in the post a couple of days ago, courtesy of Dom, who apologised very politely for the slight delay in sending them to me. If you haven't ordered anything from him before, I can thoroughly recommend his products and his way of going about things. Anyway, they're ready to be cleaned up and painted as soon as I have an hour or two to spare.

I've also scrounged a whole load of high density insulation foam from work. The roof of my block is being re-clad in 1 metre square sheets of foam, to a depth of 15cm, so I have a couple of sheets and some off cuts to use for terrain which would otherwise have gone in the skip. It smells a bit fishy but apart from that it'll be perfect for sculpting some fjord cliff sections.

This looks like a definate project for the Summer...


Monday, 28 March 2011

Red Armoured Train [6]

Not a lot done this evening as I'm a bit knackered. I have, however, covered the artillery wagon with the usual Future based gunge wash then added a light drybrush of Foundry Phlegm Green and Arctic Grey to highlight the details. I also added a big Soviet red star decal to the turret so that it looks a bit less 'green'.

I thought about some sort of slogan for the sides of the wagon but decided to save that for the engine tender or one of the other carriages. I still need to paint the buffers and add a few rust streaks here and there but otherwise I think it's pretty much finished, with a matt varnish spray being the last thing to round it off.

Sunday, 27 March 2011

Red Armoured Train [5]


I've finished the construction work on the artillery wagon, including the rungs for the access ladders and grab handles plus a chain coupling for the front end and some tiny metal soviet stars for the doors and turret. The rungs were made from staples, the coupling from some old necklace chain and the stars were salvaged from my lady wifes' box of paper craft card making nicknacks.


I've started painting the artillery wagon with three stages of Foundry Phlegm Green wet and drybrushed over a Halfords spray black undercoat. It's drying off so the wash and weathering will have to wait until tomorrow. In the meantime, I've started on the second armoured wagon, which has been plated up in 1mm styrene sheet.

My eldest son, Alex, has been a keen observer and wants me to add a roof mounted machine gun turret rather than the side mounted machine guns that I originally intended. If I can find a suitable thing to make a turret out of I may add one but I'll probably stick with the original plan for the sake of convenience. He also suggested a missile launcher but that might not be a such a good idea?

Saturday, 26 March 2011

Red Armoured Train [4]


I got some time in on the artillery wagon today, although I had to fit it in around the usual stuff that gets in the way. I added a rim of plastic card around the gun mounting then tackled the turret. This was re-invented a couple of times but, with the use of a flying stand as a gun barrel and a piece of Lego as a cupola, I now have a fairly decent turret mounted field gun.

I decided to add a roof to the wagon as well, using a sheet of 1mm plasticard superglued in place. I then added some strips of half round beading and some ventilator type things out of squares of styrene and metal washers. The business end of the wagon was fitted out with buffers made out of mapping pins. I finished off with some armoured doors cut from 0.5mm plastic card.

I need to add some ladders and grab handles to the wagon using metal staples but that can wait until tomorrow. I debated the merits of adding individual rivets to the sides of the wagon but decided it was too much hassle. If I get the time, I'll also start on the second wagon which is most likely to be an armoured command carriage, complete with side mounted heavy machine guns.

Friday, 25 March 2011

Red Armoured Train [3]


I started to plate up the artillery wagon tonight, including the revised gun mounting and new octagonal gun turret. The turret consists of two octagonal fridge magnets stuck together with superglue then covered with 1mm styrene sheet, cut into individual sections and glued to the hex sides.

The circular gun mounting was cut from 1.5mm styrene sheet glued to the original hex base. I then added a metal washer as a turntable for the gun mounting, with the fridge magnet acting as the means of attachment. I need to add some greenstuff to fill the gaps, before I crack on with the scratchbuilt gun barrel and deflector plates. 

Thursday, 24 March 2011

Red Armoured Train Ideas

I've been thinking about the format of the turret on the scratchbuilt gun wagon and reckon I've come up with something that will look pretty effective. I've based the shape and layout on plans of a Polish armoured train wagon, which has a similar layout and design to my version, albeit with two turrets instead of one.

I was rummaging around for a suitable basis for the turret itself and found an octagonal fridge magnet that is about the right size to mount on the gun platform, although I'll need to change it's design. It will need to be covered in a skin of card or thin plastic card and I'll have to scratchbuild a gun barrel and deflectors but I think it'll do the job really well.

I've also been thinking about the options for the rest of the wagons. In the CLA rules you are allowed a wagon with a field gun turret, a wagon with two sideways firing field guns, a wagon with up to four machine guns and a wagon with loopholes for the transported infantry inside.

It's strange that there is no turreted machine gun option but I might build a removable one for the transport wagon, so that I can upgun it if I want extra firepower. The standard machine gun wagon is, however, the next to be built, although it's very expensive in points so may be downgraded to two rather than four guns.

Wednesday, 23 March 2011

Red Armoured Train [2]

I started on the first wagon for the armoured train this evening by disassembling one of my three Teamster passenger carriages before cutting off one end with a razor saw. I then trimmed off the seats from the far end of the carriage interior to create a flat base for a gun turret mount.

The carriage was then re-contruced, so that I could start plating up the sides and adding a gun mounting to the truncated end, using some plastic hexes as a former. I wanted to make the gun mounting circular but couldn't find anything to use as a template, hence the easier option of a hex shaped base.

It's all a bit rough and ready at the moment but I'll have a go at tidying it up tomorrow, although I have a late meeting to attend so may not make much progress. I'm not sure it's quite right yet so will need to fiddle about a bit before I'm ready to crack on.

Red Armoured Train [1]

Following the game yesterday, in which Jon's White armoured train proved it's worth in denying a Bolshevik victory, I have decided to build my own armoured behemoth for the Third Workers and Peasants Shock Brigade.

To this end, I have been doing some internet searching and have found some very useful scale drawings of various World War One and Russian Civil War era trains. These will be very helpful in scratchbuilding something that looks reasonably authentic.

I have already stockpiled some Teamster diecast engines and carriages for just such a project, so have the rolling stock I need as a basis for the armouring and arming of the train. I know that Jon used the same toys as the basis of his armoured train so I should be able to make something similar, with the advantage that it'll be compatible with his scratchbuilt track, at least until I can make my own.

I'm going to make a train with an armoured engine and tender, a turreted artillery wagon, a command wagon with machine guns and a troop carrying wagon, possibly featuring an AA gun of some sort or just some small arms gun loops. I'll make a start on this today and hopefully get the bulk of it done over the weekend.

Back of Beyond Battle Report

Jon and I played out at a meeting engagement between his Whites and my Reds last night. It turned out to be a bit of a close run thing, although the Whites only held on by hiding behind an enormous armoured train for most of the game. In casualty terms the Whites came off worse, mainly due to my armoured car's twin machine guns, the strafing of my plane (once it turned up half way through the game) and the close range fire of my Cheka infantry who held on until virtually wiped out.

The Reds didn't come off entirely unscathed, however, with Jon's armoured train shooting up my tank and my field gun, turning them into piles of twisted metal. He also lobbed a few shells into my infantry in the centre with his field gun, then followed up with a fusilade of Lewis gun and rifle fire which cut them to pieces. This was balanced by the annihilation of his Cossack cavalry on the left flank when they charged into the crossfire from two reserve Red infantry units.

At the end of the day, it was stalemate, with Jon's armoured train left untouched and able to steam up and down the track at will. My aircraft and armoured car were also in full working order and would have shot up what was left of his infantry in due course. I could have assaulted the armoured train with my infantry bombers but this would probably have been a suicide mission. As a result, I suspect that both commanders would have withdrawn their forces under the cover of darkness, to lick their wounds and write up their after action reports in glowing terms for the higher command.

A good game but it did highlight once again the holes in the Contemptible Little Armies rules that make them frustrating to use for the Back of Beyond. The lack of an index and the sprinkling of rules throughout the text make it difficult to find the information required for specific situations. There are also some rules which inhibit certain actions, particularly moving and firing, which seem unrealistic. We have made some club ammendments to the rules to address these issues, as the core of the system is good, but it's time to find another set of rules to use for the Back of Beyond.

I quite like the look of Triumph and Tragedy whilst Jon suggested Through the Mud and Blood. I think a bit of playtesting with one or other of these systems would be the way forward. We've used Warhammer Great War for VBCW in the past too, so that might be another possible option. I think I also need to build an armoured train for my Bolsheviks, as they're pretty effective and look really cool! If I had the time, I'd also either finish off my Japanese or start a new (small) army...but that's another project for another time.

Third Workers and Peasants Shock Brigade!

Although my car has been playing up over the weekend, with squishy brakes and a strange hissing noise when the pedal is used, it looks like the Back of Beyond game is all systems go!

In a futile bid to intimidate my Tsarist opponent, I've worked out a formidable force for the meeting engagement scenario in which we'll be crossing ideological swords. As you can see, I've gone  for mobility over firepower, choosing not to use any off table artillery but making sure I have good air and armour support.

One unit (8 figures) - Cheka volunteers, T3 / M5, stubborn with bombs
Three units (12 figures) of Red infantry with bombs, T2 / M3
Plus one LMG per unit
One Sniper, T5 / M5
One HMG, T2 / M4
One Field Gun, T2 /M3
One Austin Armoured Car, 2 x MG (ST)
One Whippet Tank, 1 x MG(T)
One Nieuport 16 aircraft
One commissar figure
Total = 746

If that doesn't work I still have the Cheka as back up and the Commissar to add a little 'encouragement' to the rest of the infantry, as and when the time comes for a tactical withdrawal.

Monday, 21 March 2011

Rapid Fire 5th Battalion DCLI [32]

Although this project seems to be never ending, I have started on the carriers and transport for the 5/DCLI this evening. I've painted the tracks on the first batch of four carriers and drybrushed the second lot, including the recce platoon jeep, with a three stage Foundry Phlegm Green basecoat.

It doesn't look that impressive now but should look fine in the end.  

Sunday, 20 March 2011

Return to the Back of Beyond

I have made absolutely no progress with anything this weekend due to an avalanche of kids birthday parties, babysitting, sprog rugby practise, furniture shopping, garage tidying and other equally mindless tasks. I have, however, set up a game at the club on Tuesday, featuring a Bolshevik versus White clash in the Back of Beyond.

I've been meaning to get back into this for a while so that I get the impetus to finish off my half completed Japanese army or, at the very least, add some cavalry to the Third Workers and Peasants Shock Brigade. I'll take some photos of the game and do a write up too.

I'm sure that my alter ego, Military Specialist Comrade Colonel Igor Tubugerov, will do himself proud.

Or he'll probably be shot.

Saturday, 19 March 2011

1/144 Zvezda Bf109F2

In the original novel, the principal threat to the 633 Squadron attack on the Svartfjord are the Focke Wulf 190's tasked with air defence over the target area. In the film, these were represented by Spanish licence built verisions of the Messerschmidt Bf108. In the proposed club participation game, I was thinking of leaving them out entirely to keep things as simple as possible but, in the interests of veracity, I suppose I should have at least some sort of contingency plan.

So, I've been looking about for a cheap and pre-painted supply of 1/144th scale Focke Wulf 190's or, as an alternative, late war Bf109F's or G's. You can get pre-painted Bf 109 E7's and FW190D9's but these are respectively too early or too late. However, you can also get kits of  Bf109 F4's from Sweet which would do the trick, although they'd need to be painted up and are still a bit pricey even though you get two in a box.

However, it seems that Zvezda have just released a snap together Bf109F2 in 1/144th specifically designed for wargaming. It's only got eight parts and is unpainted but would be ideal for the 633 Squadron project as it's less than three quid per kit. I don't think it matters that it's a bit long in the tooth for 1944. As we'd only need half a dozen or so, this makes it a viable stand in for the far more expensive pre-painted option.

I'll get one and see what the kit is like.

Friday, 18 March 2011

Northstar Foundry Sale

I spotted this offer today and, in particular, the three packs of naval figures that I could use for pirate games, albeit in a much later period. At six quid a pack they're excellent value and useful as a little self contained painting project in their own right. It's a shame there isn't another pack of gun crew or generic crew figures but at least I'll be able to put a decent skirmish force together for a cutting out raid, anti-slavery boarding party or amphibious landing boatcrew.

Excellent!

Postscript: Just had an email from Northstar to the effect that they'd run out of Marines. Oh well, at least I have some nice crew for a Royal Naval cutter or suchlike. I can always find some troops from another range, perhaps more appropriate to the mid 1700's? 

Thursday, 17 March 2011

Old West Railroad Train [5]

I painted the flatbed railroad wagon to finish off the train this evening, using a variety of drybrushing and washes to simulate some sort of weathered timber effect. I think it came out OK but still needs a final light dusting over to pick out the planking. I have another wagon that I could bash into a boxcar or flatbed but, to be honest, I need to move onto other things.

I've really enjoyed painting up the train and hope to use it in the Back of Beyond once it's finished with as a prop for the club participation game. As a result, I've left off any lettering or numbering so that I can add some suitably Chinese or Soviet insignia later on. I think it'll look great alongside my old Bolshevik forces or my as yet unfinished Japanese army.

I haven't been up to the club since November mainly due to work and family commitments. However, I'm hoping to drop in next Tuesday to hand over the train and have a chat about the game itself. I'm also hoping to stir up some interest in the 633 Squadron game by taking along the 1/144th scale diecast Mossies and, if they arrive in time, the 1/600th scale Tumbling Dice planes as well.


Wednesday, 16 March 2011

Coastal Forces Books

I was very pleased to add this to my collection of coastal forces related books, having read a library copy a few years ago with a great enthusiasm. I already have a stack of books on coastal forces actions from a variety of authors but there is always room for a few more.

Tuesday, 15 March 2011

Valiant 6 Pounder AT Gun Kit

As expected, the Valiant 6 Pounder arrived today and very sturdy it is too, compared to the SHQ and Airfix versions that I originally intended to use. I wouldn't be surprised if this is the old Raventhorpe gun as the crew figures look very much like the metal crew figures I've seen in the vehicle range. It's a good piece of kit nonetheless and will be easy to stick together as it only consists of five components.

Monday, 14 March 2011

Old West Railroad Train [4]

I've super-glued the washers onto the carriages this evening to replace the bright red bendy plastic wheels that they were fitted with. They need to be toned down a bit but I think they look better than the originals.

I've also fitted out a spare wagon chassis with a flatbed. It needs to be painted and weathered but will be useful when the train gets re-assigned to the Back of Beyond after the club game is completed.

Rapid Fire 5th Battalion DCLI [31]

Not a lot on the Rapid Fire! front over the last couple of days but I have managed to assemble and undercoat the FAO carrier, the recce platoon jeep and a carrier for the extra Vickers HMG team. I've also stripped the figures from the 6 pounder AT gun base to make a second Vickers team for the 8th Middlesex. The AT gun will be re-crewed with the metal figures from the Valiant 6 Pounder gun set that I should get in the post tomorrow.

North Star Matabele Deal

I had my eye on this army deal from Northstar in the hope that the price would drop to something vaguely affordable and, hey ho, so it did:


In a bid to inject much needed financial stimulus into the flagging economy of Nottingham, I sent a grovelling e-mail to the Ministry of the Interior, pointing out the excellent sculpting and exceptional variety of the North Star Matabele figures. I also pointed out that they were half price and the equivalent of less than 75p per figure!

She wasn't impressed by my aesthetic and altruistic financial arguments but did concede that I could have them, on the understanding that I would sell my soul into a pact of DIY feudal servitude. This sounded good to me, so I wizzed off an order to Northstar and will have a shiny new box of metal bits to dribble over in a few days time.

Cue: frenetic victory dance in a righteous Matabele stylee!

Oh yes.

I'm hoping that the DIY Pact of Darkness will be forgotten if I toady and grovel enough in the next few days? The figures will be delivered to my work address so that I can squirrel them away into a dark corner when the robo-turrets and sniffer dogs aren't looking, thus avoiding inconvenient questions and suspicious mumblings. A cunning plan no less!


Sunday, 13 March 2011

Old West Railroad Train [3]

I tackled the coaches this evening, with a matt black spray undercoat followed by a drybrush of Foundry Conker Brown and Rawhide. They look a little lighter than I wanted but ended up not too bad. I've also added a few extra touches to the locomotive.

I decided to leave the wheels off the carriages for the moment, as they look too tall with them on next to a 28mm figure. There's not a lot I can do about the engine, however, so it'll have to be a little higher and a bit overscale than the rest of the train. Never mind. Isuppose I could cut the roof of the cab down and then glue the top back on?

I may add a few extras tomorrow, including filling in the screw heads on the locomotive and adding some numbers and writing to the train but I have a late meeting so won't get home until 9pm or thereabouts, so progress may well be mimimal.