Wednesday 31 March 2021

The Royal Navy's Revenge

I re-ran the last couple of turns of the 'Operation Goldfish' scenario as a paper exercise this afternoon, taking on board the inability of the Riga class frigate, KRI Jos Soedarso, to use her torpedoes against HMS Alliance. It went like this...

Turn 12

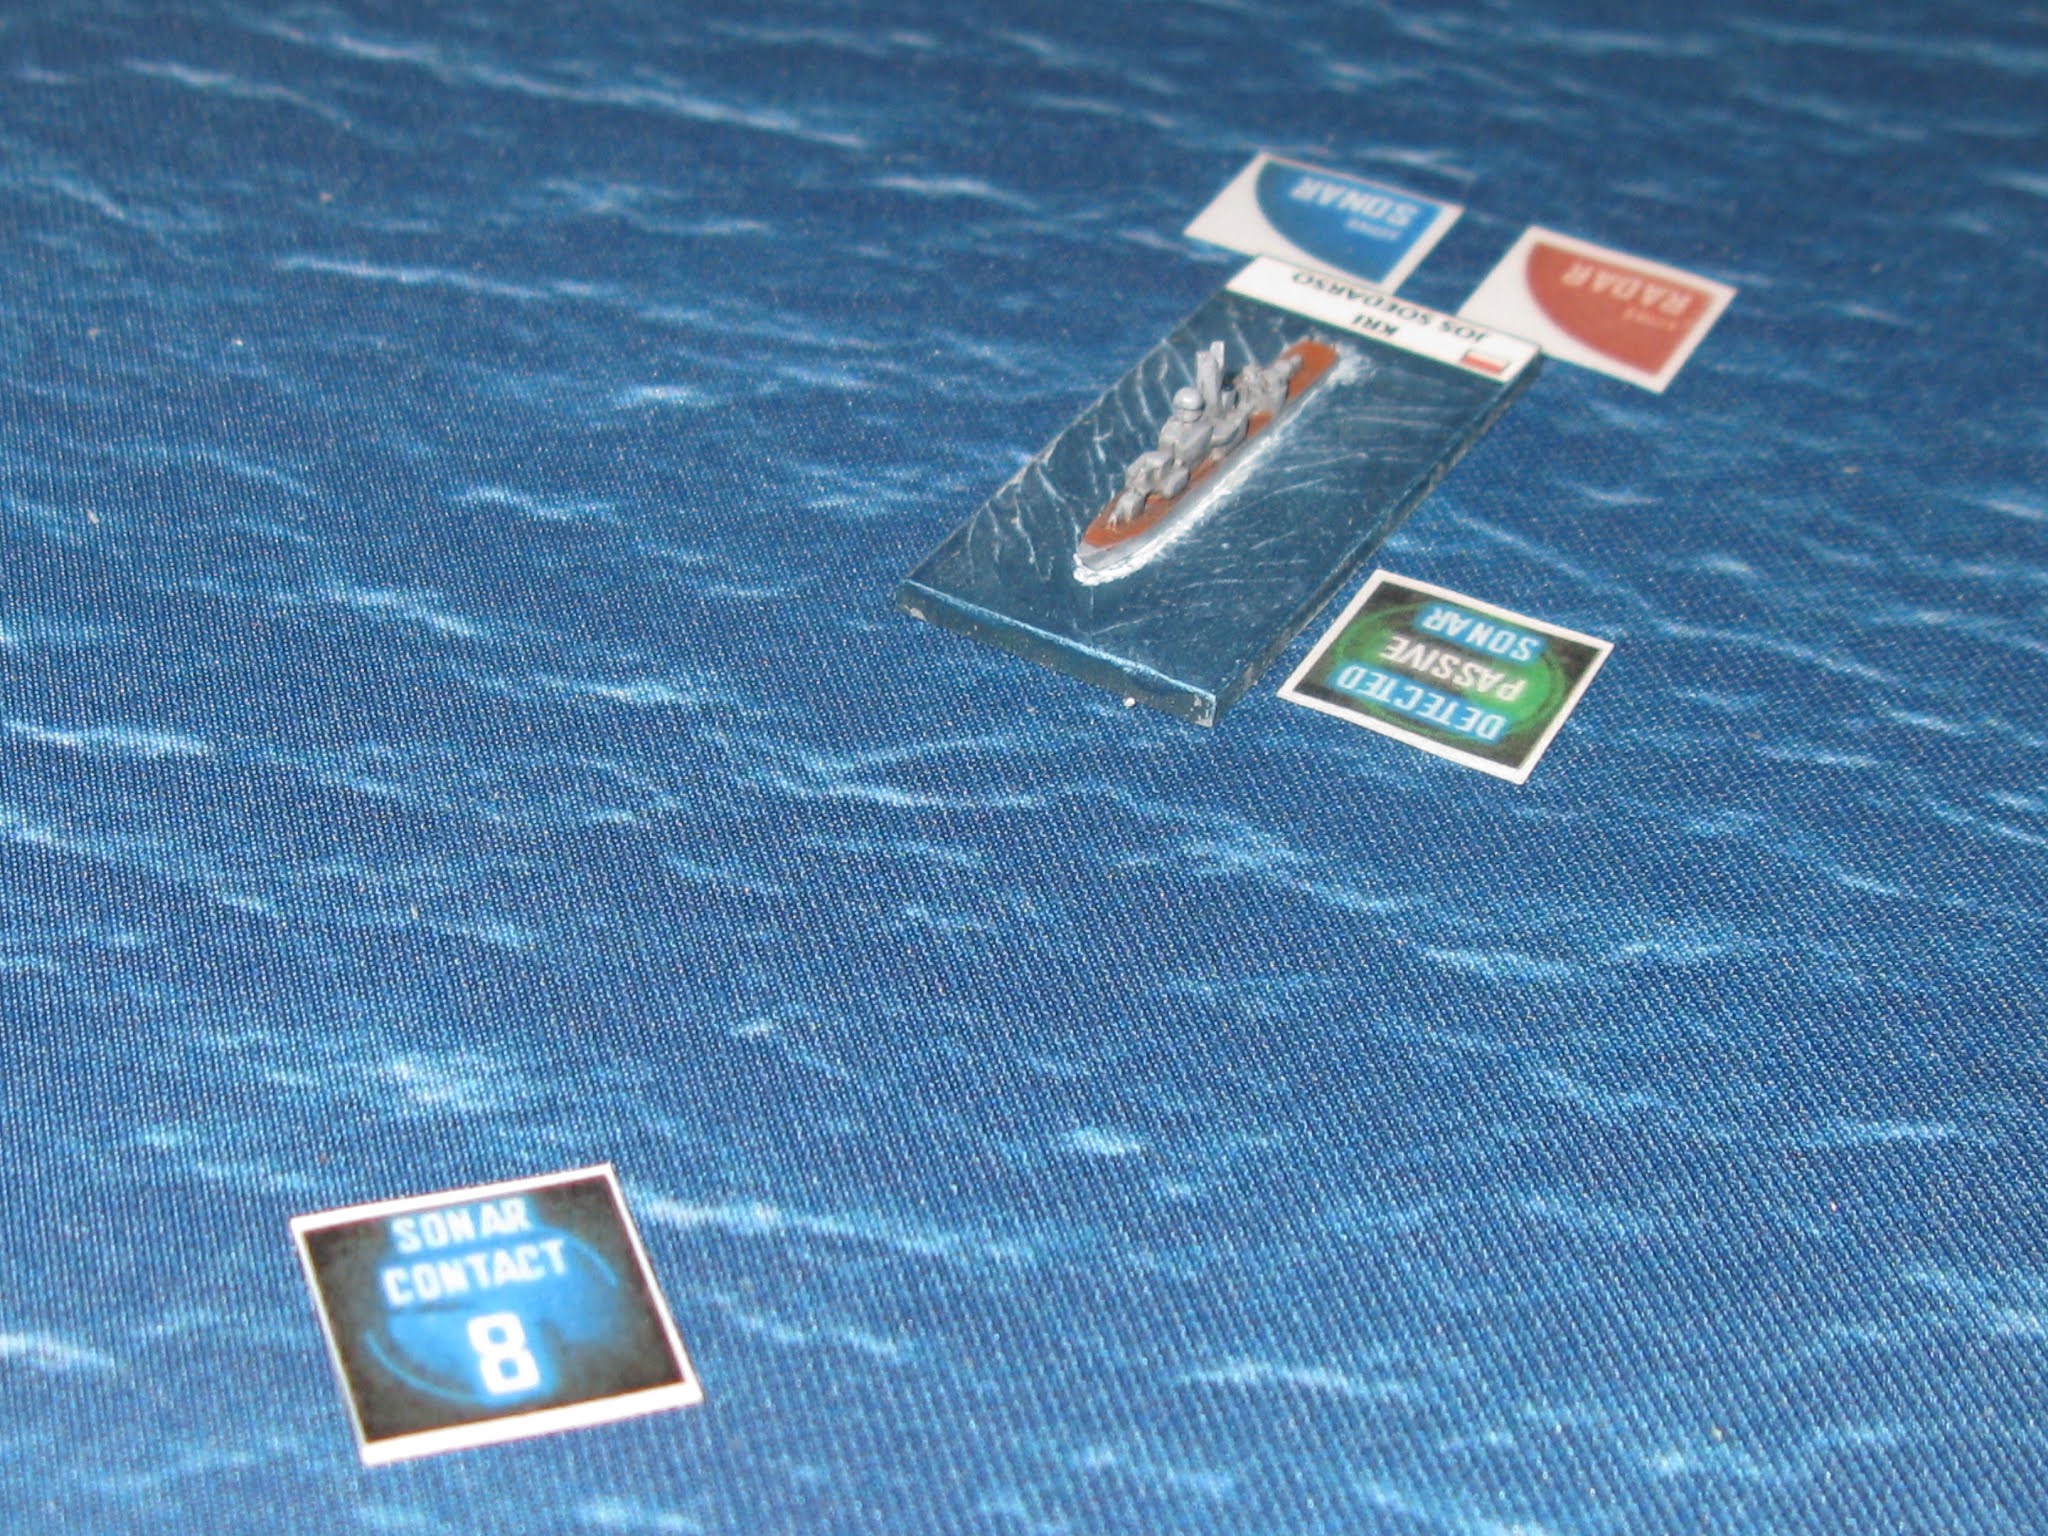
The end of Turn 12 was exactly the same, apart from HMS Alliance only firing four torpedoes, as I thought it was a bit cheeky for her to use both her bow and stern tubes for a head on attack. I crossed off the last two die rolls from the previous game, which was fine as they both missed. I decided to leave the hit result and damage the same as before, with the frigate suffering heavy damage, light damage and a fire, compounded by another light damage due to the fire spreading. So far, so good (unless you were on the receiving end of course).

Turn 13

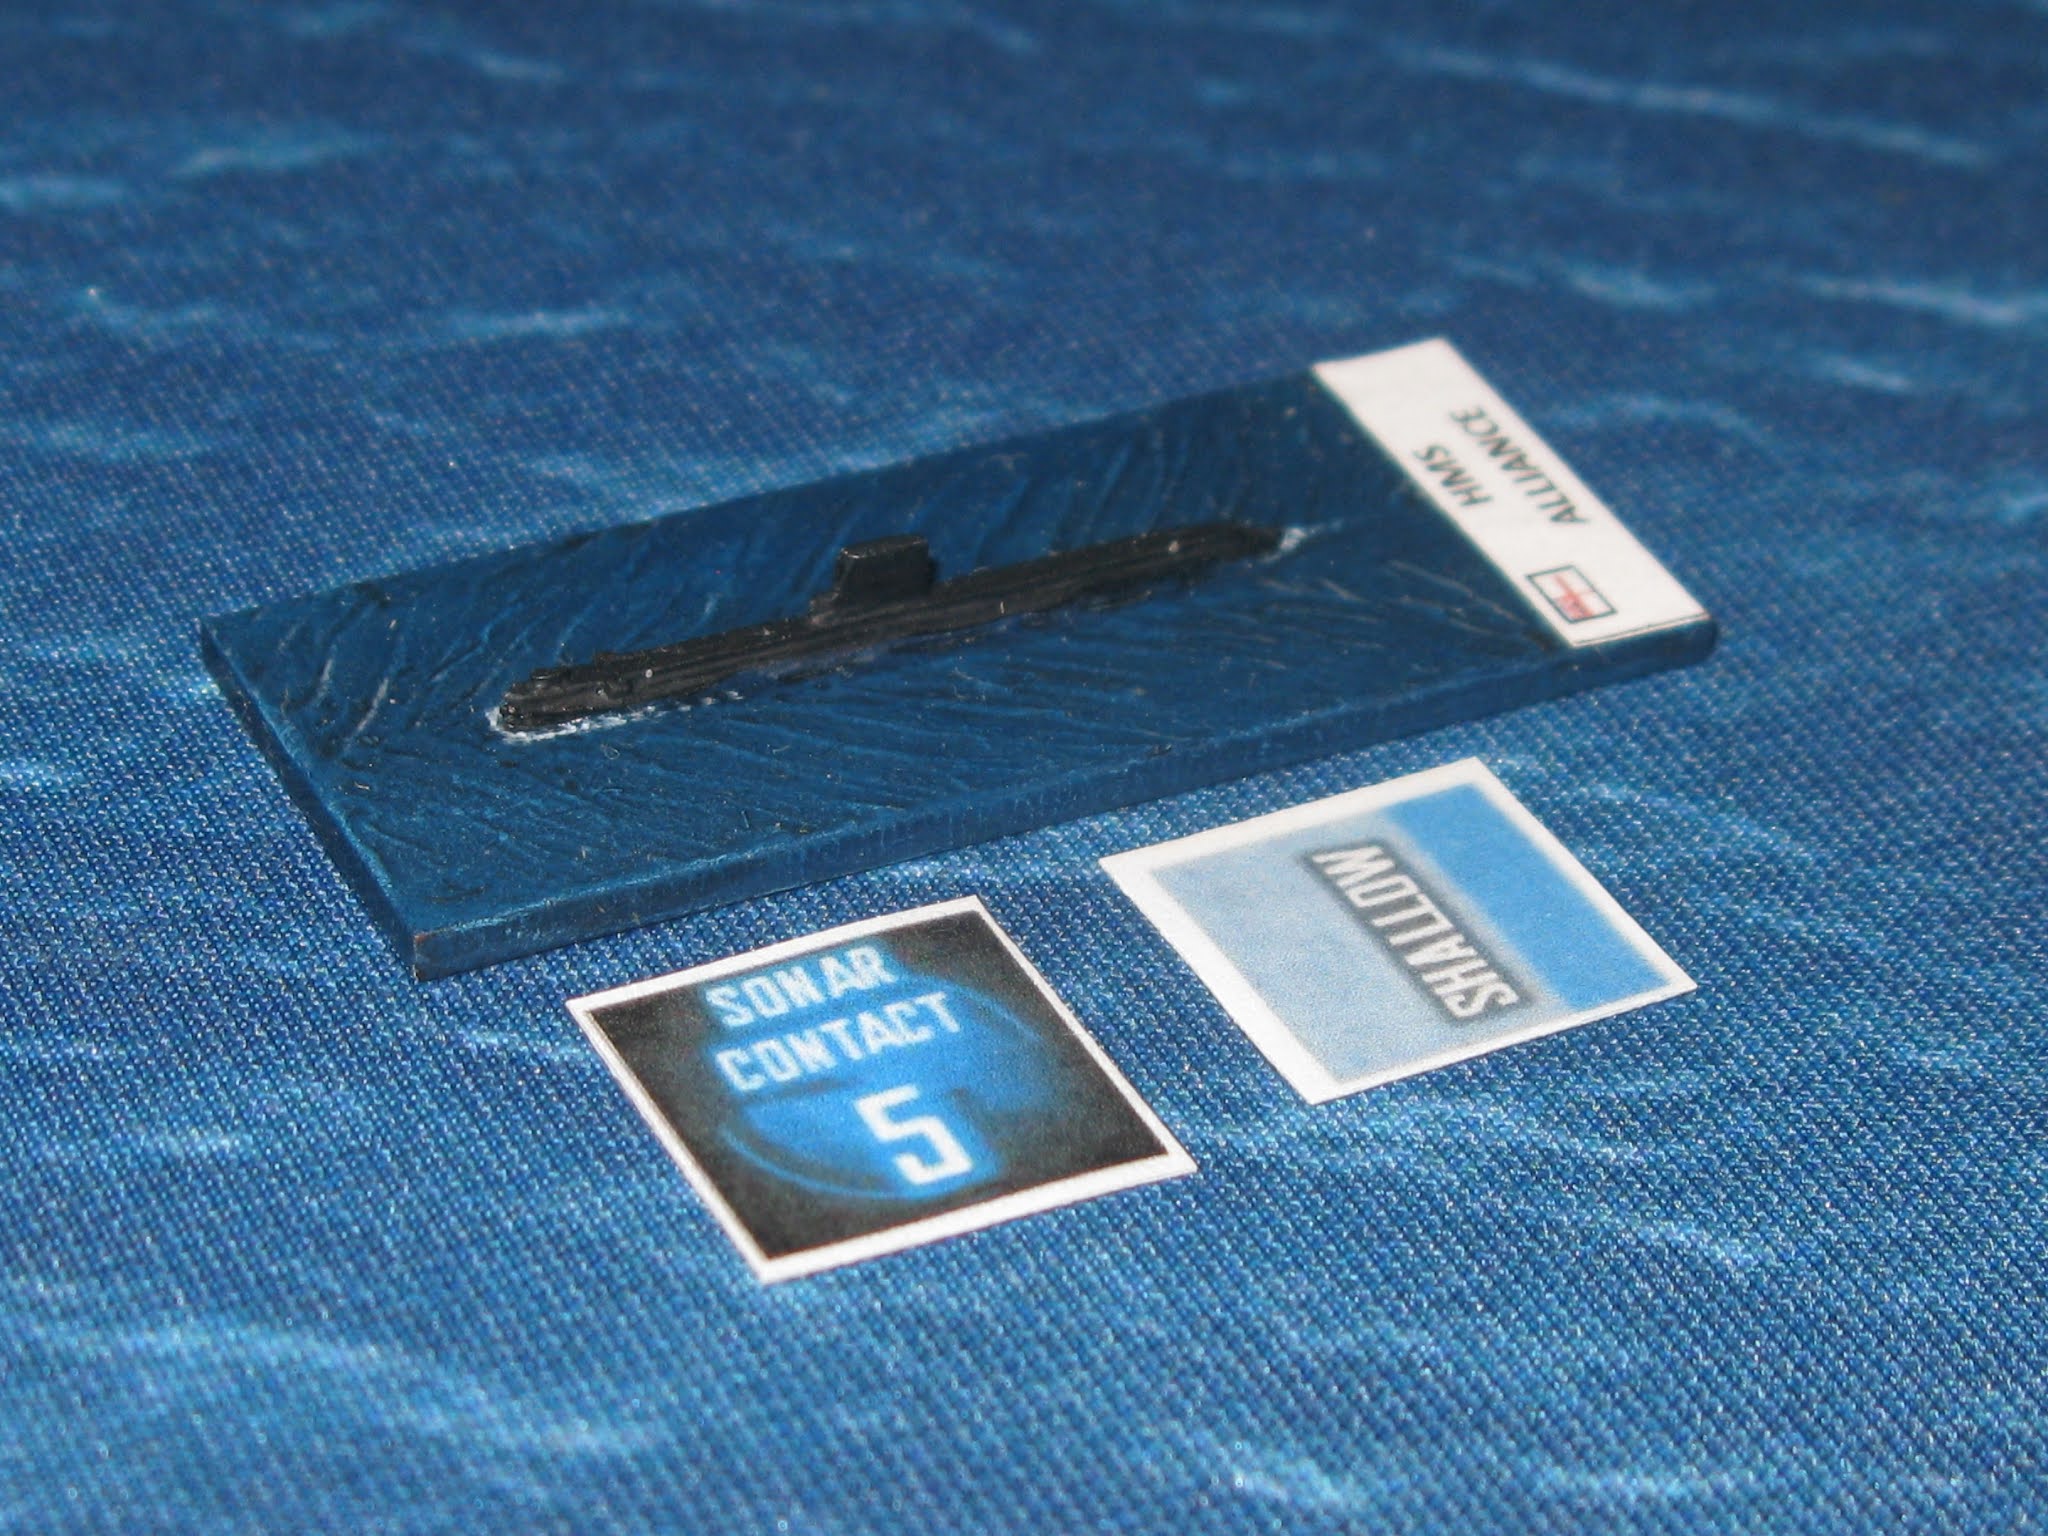
In the next turn, the Indonesian commander won the initiative so moved first, steaming directly ahead to close the range to less than 12cm, so that he could use the MBU-600 anti-submarine rockets. However, the commander of HMS Alliance wasn't having any of that, so decided to stop dead in the water, effectively making the range a good 15cm, no problem for the torpedoes but useless for a rocket launcher salvo. The submarine also switched to active sonar, to give her Mk8 torpedoes a better chance of hitting the target, which was now clearly detected and accurately pinpointed.

In the Attack Phase the frigate was a sitting duck, so HMS Alliance launched all four torpedoes and achieved a D10 roll of 3, 4, 5 and 8, which meant three hits with +2 added for the active sonar fix. I rolled the damage dice for these hits and got 1, 8, 3 and 8. This was modified with +4 for the torpedo damage rating, + 4 for existing damage to the frigate, but only -1 for the warship's construction, giving a final result of 8, 15, 10 and 15. As the damage table only goes up to 14, you can work out the end result for yourself but there was a very, very large BANG and nothing much left floating around afterwards.

This meant that the submarine not only escaped but that there would have been no survivors to reveal that an SBS team had been landed ashore. A double win for the Silent Service.

What does this all mean?

So...in the light of this scenario having a revised outcome, I also looked back at the previous scenarios to see what would have changed. It was clear that HMS Oberon would also not have been sunk or even scratched in the 'Ill Met By Moonlight' scenario, but the losses to the Indonesians would still have occurred. To see how that changed the overall campaign, I did a running tally of the losses to both sides and it now looks like this:

Royal Navy

HMS Blackpool FF - Sunk (gunfire / torpedo)

HMS Falmouth FF - Heavy Damage (air attack)

Indonesian Navy

KRI Kakiali FF - Sunk (torpedo)

KRI Ngurah Rai FF - Sunk (torpedo)

KRI Jos Soedarso FF - Sunk (torpedo)

KRI Lambung Mankurat FF - Heavy Damage (torpedo)

MiG-17 Fresco Fighter Bomber x 2 - Shot Down (AA)

Il-28 Beagle Light Bomber x 1 - Shot Down (AA)

....in other words, the Royal Navy is most definitely not losing the campaign and is in fact giving the Indonesian Navy a right thrashing.

AK47 Odds and Ends

In the last game of AK47 I played I noticed that I was short of a few stands for the Superpower Backed army, which are needed for the political flow charts. These include some tribal militia heavy weapons bases and some regular HMG bases. I thought I'd add these now as a quick painting project over a couple of days, so here they are ready for an undercoat, before I go on to the Back of Beyond stuff. 

Torpedo Trouble


I was already dubious about the torpedo capability of the Riga class frigates, after the guided torpedo issue, so was not surprised to be informed that the unguided Type 53 was only for use against surface targets. I had my doubts already, as I knew they were originally designed for submarine use. I'm indebted to Dylan Jones for clarifying the torpedo technological twists, not once but twice.

So, to cut a long story down to size, this means that HMS Alliance would not have been sunk in the last scenario. In fact, she would have been able to fire a second salvo while still well out of range of KRI Jo's Soedarso's RBU 600 ASW rockets, which would have destroyed the frigate in one all almighty bang! I may rerun the last couple of turns but I'm sure this would be the outcome.

It also means HMS Oberon probably survived her encounter with the Riga class frigates in the earlier game....but I'll leave that one as it is for the moment as it complicates the scenario narrative. I told you this was a learning experience and it shows how little details can make a big difference to the outcome of a game. On the other hand, the Royal Navy are now winning, so it's  not all bad!

Tuesday 30 March 2021

Royal Navy Taskforce


I finished the latest additions to my 1/3000th scale mid-1960's Royal Navy Task Force this afternoon, with two Leander class frigates, two Daring class destroyers and two County class guided missile destroyers. I now have enough for a decent sized battlegroup, minus an aircraft carrier and auxiliaries which I'm saving for a rainy day, so will clear the decks for something different. I've enjoyed painting these up and will definitely be using some of the new additions for some scenarios, finishing off my Indonesian Confrontation solo campaign. 

Jet Knights of the Sky Bases

The club did a bulk order of bases and magnetic pick up tools for Jet Knights of the Sky a few weeks ago and I collected mine yesterday. I now have enough for three more stands, so will crack on and build them so that I can run some more play testing sessions before we return to the club in June, if it all goes according to the plan? I can also start on the aircraft model making, which I've sidelined whilst focusing on naval stuff over the last couple of months. 

Monday 29 March 2021

Royal Navy Painting

I've made some progress on the extra RN and RAN surface warships for my Indonesian Confrontation project, with the detailing and highlighting well underway. If I'm free tomorrow I should get them finished including the bases but I suspect I will be called into work, so it might take a bit longer? 

Operation Goldfish Game Report

In this scenario, the Royal Navy Amphion class submarine HMS Alliance was tasked with dropping an SBS commando surveillance team, while attempting to evade detection by the Indonesian Navy Riga class frigate KRI Jos Soedarso. The submarine was using the hidden movement rules in Naval Command by which she could 'leapfrog' between ten contact markers which acted as stepping stones from deep water to the shallows offshore. The frigate had to eliminate the markers by active sonar detection in order to pinpoint and attack the submarine.

In Turn 1 HMS Alliance redeployed from Contact Marker 1 to Contact Marker 2, while KRI Jos Soedarso moved toward Contact Marker 3, which she successfully detected by sonar and eliminated. In Turn 2 HMS Alliance skipped to Contact Marker 8, while the frigate steered for Contact Marker 4, which was the closest to her position, successfully detecting and eliminating it as a false contact. In Turn 3, HMS Alliance moved to Contact Marker 7 and successfully identified KRI Jos Soedarso using her passive sonar but the frigate failed in her attempt to detect the submarine an intermediate range.


In Turn 4, HMS Alliance moved to Contact Marker 6, which meant running at shallow depth. The frigate moved toward the now vacant Contact Marker 7 and successfully detected it as a false contact. The net was closing on the submarine but in Turn 5 HMS Alliance moved to Contact Marker 9, which placed her in position to land the SBS team next turn. KRI Jos Soesdarso moved toward Contact Marker 8, which was the nearest one but failed to detect it. 

In Turn 6 HMS Alliance stayed put to drop the SBS team which swam ashore underwater. The frigate meanwhile headed in the opposiite direction to Contact Marker 8, which was successfully detected. This meant that the extraction route for the submarine was compromised and that whichever direction she decided to take would mean moving as a Contact Marker rather than using a stepping stone approach. In Turn 7, HMS Alliance moved to Contact Marker 5, which now became her own marker, while KRI Jos Soedarso steered for Contact Marker 2, which she failed to detect or eliminate.


In Turn 8 and Turn 9, the submarine began to move as Contact Marker 5, with a top speed of only 4cm per turn submerged. It was clear that to escape the frigate, she would probably have to attack with torpedoes before she could be detected, in order to eliminate the warship and prevent the mission being compromised. The frigate was moving ever closer and in Turn 10 managed to detect and eliminate Contact Marker 2, which made her next detection target Contact Marker 1, the last before the actual position of the submarine at Contact Marker 5.

In Turn 11 the frigate failed to detect Contact Marker 1 while HMS Alliance slipped into deep water. However, rather than going deep she decided to stay at shallow depth so that she could target the frigate and, if necessary, make a pre-emptive strike with torpedoes. In Turn 12 KRI Jos Soedarso, succesfully detected Contact Marker 1, which left no contact markers in the deep area of the table for HMS Alliance to hop over to, even if she had been within 30cm hidden movement range. The two warships now turned onto a converging head on track.


In Turn 13, HMS Alliance prepared to attack, expecting to be identified by the frigate and hoping to strike before she could react. In the detection phase, KRI Jos Soedarso finally achieved a successful active sonar detection of the submarine, which immediately launched a full salvo of six Mark 8 unguided heavy torpedoes at almost maximum range. Two of these hit home, causing a heavy damage, a light damage and a fire, knocking out the sonar in the process. This was just not enough to prevent the frigate from launching her own attack, firing two heavy guided torpedoes at the sonar contact. Only one of these hit but it caused terminal damage, destroying the torpedo room, causing heavy damage and starting a catastrophic flood.


In the following damage control phase, HMS Alliance fluffed her damage roll and the flooding spread to result in yet another heavy damage counter and the submarine effectively sinking. The frigate also failed the damage control attempt, with the fire spreading to cause additional light damage. I decided the scenario was a minor victory for the Indonesians, as despite sinking the submarine, the SBS team had been successfully landed and was still undetected, while the KRI Jos Soedarso was critically damaged. I also decided that the frigate would not make it back to port, running into two RAN Daring class destroyers on patrol and being swiftly despatched by torpedo and gunfire.

In retrospect, I realised that I should have been using unguided torpedoes for the frigate which may well have swung the game in the Royal Navy's favour. It was bad luck that of the six torpedoes fired by HMS Alliance, only two hit the target, as even one or two more would have probably sunk the frigate leaving the submarine a clear escape route. It was good fun, nonetheless, and the next scenario has not been compromised by the loss of the submarine.  I like the rules for hidden movement and the counter 'stepping stones' worked well. I may well replay the game again at some point, perhaps with a few more contact markers and with the torpedoes downgraded to see what happens?

Sunday 28 March 2021

Damn the Torpedoes!

I realised today that I've been using the heavy guided torpedoes listed for the Riga class frigates and Skory class destroyers, which have been decisive in a couple of scenarios, when I should actually have been using Type 53 unguided ones. The guided versions didn't come into Soviet service until 1965 at the earliest, so I've made it too far easy for the Indonesian ASW warships to hit and sink their Royal Navy targets. No wonder they have been doing so well!

Operation Goldfish Flushed Away


I played the Operation Goldfish scenario for my Indonesian Confrontation solo campaign this afternoon and, unfortunately, it didn't go according to plan for the Royal Navy yet again. I won't reveal the grisly details now but HMS Alliance won't be coming back from this particular patrol. It wasn't all bad news, however, as the SBS team was successfully landed and remains undetected by the Indonesian forces, so will be able to complete the naval gunfire support mission next game. The Indonesians also have a very badly damaged Riga class frigate, which I have decided will run into a couple of RAN destroyers as it limps back to port, so she does not survive long enough to reveal any compromising intelligence, especially as the heavy damage and a raging fire have destroyed all comms. I'll write a full report tomorrow...stay tuned.

Back of Beyond Bolshevik Bonus


I did some back of a fag packet calculations yesterday and worked out that if I paint three new command figures for my Bolshevik infantry, together with the unit of naval troops, I will be able to deploy another field gun. There's a standard ratio of three infantry or cavalry units for each artillery piece, so I will have the required number without having to paint many more figures. 

I have some spare artillery crew, so all I need is a suitable bit of artillery, with the 28mm Really Useful Gun range from Irregular Miniatures being an obvious place to look. I fancied something with a bit of punch, so have sent off for a Schneider 122mm howitzer, which I think will look really good when I paint and base it up.

Saturday 27 March 2021

Modern Naval Options

I've had a change of direction with my modern naval project plans and have decided that, rather than focus on a Cold War Chinese - Taiwanese conflict, it would be much more interesting to try out a contemporary, twenty first century theme. I've been looking for a suitable context for this for a while, having already gathered together some French warships as a potential option, but I have decided to go for a modern Chilean fleet for a number of convincing reasons. 

Not only is it a varied and interesting fleet, with a Type 22, Type 23's, Adelaide Class and Karel Doorman class frigates, it also is the most professional, capable naval force in the region. As potential adversaries the Argentinians are an obvious option choice but you can also run a War of the Pacific 2 with the Peruvian navy, using it's relative strength in submarines to counter the surface warfare capability of the Chilean navy. 

There's also a potential clash with the PLAN, perhaps over fishing in Chilean territorial waters, which has been a cause of tension recently. I also have some suitable coastal terrain, so that angle is already covered. I have dispatched an order for 1/3000th scale Chilean and Peruvian warships to Navwar, so may well start this as an Easter holiday painting project in a week or so. Here's a bit of video which gives you a good idea about the capability of the Chilean navy, as an effective and well equipped force:


Hunter Killers


I'm enjoying the Cold War submarine scenarios that I've been playing recently, so thought I'd do some reading round the subject. Despite the garish action thriller cover, this is actually a really informative and well written overview, as you'd expect from the author. I'm whistling through it now as it's an easy read and a good source for more cloak and dagger submarine scenario ideas.

Thursday 25 March 2021

Back of Beyond Bolshevik Sailors


I enjoyed painting the mountain gun for my expedition army, so had a rummage for another unit to paint up, this time for my Bolsheviks. There's an empty foam figure storage tray in the bottom of the army box, so I've decided it will be filled up with a unit of naval infantry and a heavy machine gun, which I've had knocking about in a plastic box for years. I think I have enough for a unit of fourteen or fifteen infantry, including a converted Lewis gunner, so enough for some useful points. They will be one of the two 'volunteer' units alongside my Cheka, so they will pack a bit of a punch and help to bolster the rest of the less than enthusiastic troops in the Third Workers and Peasants Shock Brigade, perhaps as the crew of a new armoured train model?

Wednesday 24 March 2021

Amphion Class Submarines for Naval Command

I overlooked the rather important requirement for some numbers to use with the Amphion Class submarine, HMS Alliance, that I am deploying in the next Naval Command scenario. A quick post on the Naval Command Facebook Group (thanks chaps!) and I now have a profile for the modernised A Class submarines of the early 1960's.

Surface Speed 5

Submerged Speed 4

Electronic Warfare (EW) 8

Acoustic Signature (AS) 6

Noise Rating (N) 8

Construction 0

Radar Rating +1

Air Defence 0

Sonar + 1

Armament - 16 unguided torpedoes (6)

There's a bit of a debate about the torpedoes used, either unguided MkVIII**, the sonar guided Mk20 Bidder or the wire guided Mk23 Grog, but I've gone for the first option if only because the Mk23's were apparently pretty unreliable and only of restricted range, which limits them a bit too much in game terms. I'm hoping that HMS Alliance won't have to use them anyway, as it's very much a cloak and dagger operation in which she's supposed to stay undetected!

Tuesday 23 March 2021

Midway


I wanted something easy to read with a naval theme, so downloaded a copy of this classic account of the Battle of Midway. It's not something I know that much about, beyond just general knowledge of the war in the Pacific, so I'm enjoying finding out more about the background history. It won't be turning into any new wargaming project but I do have some 1/3000th scale Japanese ships for the early war, so who knows?

Monday 22 March 2021

Cold War Chinese Navies


I had an idea yesterday, revolving around a 1960's to 1970's clash between the Peoples Liberation Army Navy and the Republic of China Navy, as another 'What If?' project. This would make good use of my existing 1/600th scale aircraft and would only involve a handful of destroyers, corvettes and fast patrol craft, mostly of a WW2 vintage. 


The Taiwanese used Allen M.Sumner, Benson and Fletcher class destroyers, amongst others, while the Communist Chinese had ex-Soviet Type 7 destroyers, P4 class torpedo boats and a few Whisky class submarines. It would be a minimal cost option and would be a good way to extend my naval wargaming 'What If?' projects in a different direction.

Sunday 21 March 2021

Operation Goldfish - An Indonesian Confrontation Scenario

The date is November 1964.

In this scenario, the Royal Navy submarine HMS Alliance is tasked with landing a No.2 Special Boat Section naval gunnery spotter team on the south west coast of Sebatik Island, so that they can identify Indonesian military targets for a punitive naval bombardment. The mission is using the cover of darkness on a moon less night in order to avoid visual detection.

The team must be dropped off shore at night, using a radical new technique for underwater insertion code named Goldfish. The submarine will not need to surface whilst the SBS team swims ashore from the submarine underwater, but it must remain undetected for the entire mission. It is expected that Indonesian naval units will be conducting routine patrols in the area and will probably have to be avoided.

At the start of the scenario, the Indonesian Riga class frigate KRI Jos Soedarso is positioned at the centre of the table, initially deployed as a contact marker. She is conducting active sonar and active radar sweeps. Her rules of engagement are to detect and destroy any enemy submarines or surface warships if encountered, with no other Indonesian naval units in the area. She may patrol in any direction but may not leave the map. The sea state is calm and nighttime visibility rules apply.

HMS Alliance is not deployed at the start of the game but is represented by ten numbered contact markers, which may be placed anywhere on the map, including at least one in the deployment zone and at least one in the SBS drop zone. Each marker must be at least 12cm from the next marker with a maximum of 30cm between each marker. They must be at least 12cm from any enemy contact marker. They must also be placed no closer than 12cm from the shoreline, as the SBS will be dropped off shore to swim underwater to the beach.

The contact markers act as stepping stones. In the first turn the position of HMS Alliance, which must be within the submarine deployment zone at deep depth, is recorded by the Royal Navy player in secret. In subsequent turns, the submarine's position may be shifted to any adjacent contact marker, adjusting the depth as required. The submarines actual position will only be revealed if she surfaces, fires a torpedo, operates in active sonar mode or is detected. HMS Alliance is operating in passive sonar mode to avoid detection. The rules of engagement state she may only attack if she has been actively detected and fired upon by the enemy.

If detected, all of the contact markers are removed and the submarine model is placed in position on the table. The frigate can attempt to eliminate dummy contact markers using active sonar detection and thus locate the actual position of HMS Alliance or force her to reveal her position by removing adjacent 'stepping stones'. This will prevent the submarine from moving from one marker to another, forcing her to deploy as a model. However, she will need to be detected before any attack is carried out. 

To win a major victory, HMS Alliance must drop off the SBS team, taking one whole turn stationary at shallow depth to do so, then successfully exit via the opposite table edge. A minor victory will result if the team is dropped off but the submarine is subsequently detected yet exits the table undamaged or with only light damage. If HMS Alliance fails to drop off the team and is detected before she can do so, it will be a minor defeat. A major defeat will result if, in addition, the submarine is heavily damaged or sunk.

Back of Beyond Expedition Mountain Gun Finished


In Contemptible Little Armies terms, this model is a White Russian mercenary 65mm mountain gun and crew, hired by my Texaco oil prospecting expedition, Tactical 3 / Morale 4 (42 points). It's not in the Dinosaur Hunter army list but I think it's a fair addition to the set up.

Saturday 20 March 2021

Who Let the Dogs Out? Game Report


I had a quick but very enjoyable game this afternoon using the scenario I wrote for the Indonesian Confrontation project, designed to try out the rules for air attack and defence in Naval Command. The three Royal Navy frigates set up in echelon formation and moved forward in Turn 1 at half ahead speed, with no air attack appearing due to a D10 roll of 2. I rolled the count down dice (1) and moved on to Turn 2, where a flight of three MiG-17's with rocket pods appeared from the North, aiming directly for the first ship on the port flank, HMS Llandaff. 


The frigates continued to move ahead at half speed, keeping together for mutual AA support. In the Air Defence phase HMS Llandaff managed to splash one of the MIG's but HMS Falmouth, which was also in AA range, failed dismally to hit anything. It was lucky that the two remaining MiG's fluffed their attack rolls, unleashing all four of their rocket pods but hitting nothing but empty water. They were obviously alarmed by their comrade in the first MiG being blown out of the sky, which spoiled their aim a bit, not to mention their laundry. The countdown roll was made (2) and the game moved onto Turn 3. 


In Turn 3, nothing turned up again, so the Royal Naval task force steamed ahead, getting ready for the inevitable second round of air attacks. After the countdown roll was made (8) I moved on to Turn 4 and this time rolled another flight of three fighter bombers, arriving head on from the East. I moved them around to attack from the North West, targeting HMS Falmouth from the starboard quarter, once again using their rocket pods to strafe the target. The Air Defence roll for HMS Falmouth was terrible, missing all three MiG's by a wide margin, but HMS Plymouth did manage to shoot one of them down.


The attack went in and the two MiG-17's scored three hits between them with their unguided rockets, blasting the frigate's topside and causing a fire, a heavy damage and two light damage results. In the Damage Control phase, HMS Falmouth's crew failed to put out the fire, which spread to add another fire counter and a second heavy damage counter. This was pretty serious but not enough to sink the ship, so the three frigates continued onward, with HMS Llandaff and HMS Plymouth moving up to escort the damaged HMS Falmouth on either side.


At this point I rolled the countdown dice (10), resulting in the scenario coming to an end, but decided to run one more turn to get another attack in using the Il-28 Beagles. I fudged the roll for this and ended up with a single Il-28 armed with two 500lb unguided bombs, screaming in from the North East and aiming straight for the crippled HMS Falmouth. However, the gunners were having none of that and, with a single barrage of 40mm AAA, knocked the flaming bomber into the sea. The end result of the scenario was a Royal Navy minor victory, with a heavily damaged frigate for two MiG-17's and an Il-28 shot down. I decided to leave the Damage Control phase and finished the game at this point.

I enjoyed this game and the scenario worked really well, giving me a good grip on the rules for air attack and defence. The next game in the sequence will be a slight change from the plan, as I want to have another go at the rules for submarines, hidden movement and sonar detection. I'll be deploying HMS Alliance on a 'stealth and dagger' mission, to drop off a 2 SBS naval gunfire support observer team on Sebatik Island, so that HMS Tiger can give the Indonesians a bloody nose on their own turf in the follow on scenario.

Labels

Bag The Hun (746) AK47 (488) Books (480) Ironclads (474) Wings at War (392) Back of Beyond (234) Pre-Dreadnoughts (228) Coastal Warfare (225) Britain's Small Wars (199) Bolt Action (175) What a Tanker (170) Target Locked On (162) Victory at Sea (155) MiG Alley (150) Knights of the Sky (149) Old West (146) Chain of Command (145) Napoleonic Naval (144) Find Fix and Strike (137) Sandbox Skirmish (119) Naval Command (118) Bag The MiG (117) Naval Thunder (117) Pirates (116) Indo China / Vietnam (114) Air War Over Khalkhin Gol (108) Fistful of Lead (108) 15mm Sci-Fi / Near Future (95) Darkest Africa (91) VBCW (89) Strength and Honour (84) Shows (79) Ancients (78) ACW (77) The Football War (75) France's Small Wars (67) Boardgames (66) Corsairs and Cavaliers (66) Shipwreck! (66) BKC (65) Rapid Fire (63) Saurian Safari (61) Cruel Seas (60) Saga (60) Air War C21 (58) Journals (57) The Men Who Would Be Kings (57) Nimitz (55) Flashpoint Alto Cenepa (53) IABSM (53) Flashpoint Taiwan (50) Finest Hour (49) Gladiators (48) International Naval Wargaming Day (47) Red Actions! (47) Scramble for Britain (44) Flashpoint Baltic (42) Fortifications (41) Cold War (39) Duel of Aces (36) SCW (36) Thud Ridge (36) Desert Spitfires (34) Flames above the Falklands (34) RCW (34) War of the Pacific (34) Death in the Dark Continent (32) Atlantic Wall (31) Post Apocalypse (31) Iron Cow (30) Lion Rampant (30) Bag the Springbok (29) English Civil War / Anglo Dutch War Naval (29) Algernon Pulls It Off (28) Mexican Revolution (28) Normandy Firefight (28) Full Thrust (27) It Rolls For Ivan (26) Bulldogs Away! (24) One Hour Wargames (24) Samurai (24) Jet Knights of the Sky (23) 28mm English Civil War (22) Imaginations (22) Achtung Kommando! (21) Flashpoint PVO (21) PITS (20) Galactic Heroes (19) Steamer Wars (19) Strontium Dog (19) Ancient Naval (18) Iron Cross (18) Winter War (16) Aeronef (15) Aircraft (15) Imperial Commander (15) Rate of Fire (15) 2mm English Civil War (14) Aliens (14) Dragon Rampant (14) Mad for War (14) Arctic Eagles (13) Black Ops (13) CY6 Jet Age (13) Congo (13) Impetus (12) Wars of Insurgency (12) Zulus! (12) Flashpoint Fleet Air Arm (11) Gaslands (11) 633 Squadron (10) Franco Thai Air War (10) Jungle Green (10) Sharp Practice (10) 28mm Future Wars (9) Bohica (9) Dux Britanniarum (9) Merry Xmas Mr Sankara (9) Adventures in Jimland (8) Cry Havoc (8) Dreadnoughts (8) French Indian Wars (8) HYW (8) Renaissance Naval (8) Star Wars Legion (8) Sword and Spear (8) Through The Mud and Blood (8) Frostgrave (7) Target for Tonight (7) Five Parsecs From Home (6) French Resistance (6) A Mighty Fortress (5) Air War Angola (5) AirWar:1918 (5) Bombers over Germany (5) Check Your Six! (5) Five Men at Kursk (5) Fivecore Skirmish (5) Maurice (5) Seven Days to the River Rhine (5) Three Musketeers (5) Arab Revolt (4) Continuation War (4) Corvette Command (4) In Her Majesty's Name (4) Infamy Infamy (4) Medieval Naval (4) Never Mind The Billhooks (4) What a Cowboy (4) Battletech (3) Gangsters (3) HOTT (3) Hind Commander (3) Lord of the Sea (3) Luft 46 (3) Mourir Pour l'Indochine (3) Sturmovik Commander (3) Wings Over Suez (3) Blood Red Skies (2) Chincha Islands War (2) Crom (2) Disposable Heroes (2) Fire and Steel (2) Fivecore Company Command (2) Iron Stars (2) Judge Dredd (2) Lethal Skies (2) NUTS! (2) No Go Zone (2) Pulp! (2) Starfighters! (2) War in El Dorado (2) Whispering Death (2) A Billion Suns (1) Air War 1940 (1) Battlegroup (1) Black Powder (1) Dropzone Commander (1) Falklands War (1) Harpoon (1) Load and Return (1) Missile Threat (1) Missiles at Sea (1) Naval Wargames Society (1) Norway 1940 (1) Spanish American War (1) Sunray is Down (1) Ultracombat Normandy (1) Xenos Rampant (1)